
Stop Rebuilding Your Dante Network From Scratch
Posted on September 14, 2026
If you regularly work on Dante networks, there’s a good chance you’re already saving your Dante sessions. It’s good practice. But I think there’s a part of that workflow that gets overlooked. Dante sessions aren’t just insurance files that should get filed away in your completed show archives. That saved session should be the starting point for your next show.
If I’ve already spent the time naming my devices, labeling hundreds of transmit and receive streams and building subscriptions for a system that I know I’m going to see some version of again, I don’t want to start from scratch the next time I open Dante Controller on show site. I want to take the configuration I’ve already built, load it onto the new hardware, make whatever changes are specific to that show, and move on.
We already work this way with our console files. We don’t rebuild a console file from scratch every time we walk into a new show. We start with a template or a file we’ve already built, then modify it for the show in front of us. The Dante network should be treated exactly the same way.
And there’s a secondary benefit to saving it. If you’ve read any of my previous blogs, you’ll probably notice a trend: redundancy. Never get caught with your pants down, so to speak. It’s never happened to me before, knock on wood, but if a console ever failed and the vendor had to get me a replacement, loading my saved console file would be the relatively easy part. That gets the console itself back to where I had it.
What that console file doesn’t do is restore everything I built in Dante Controller. It doesn’t name any of my Dante transmit and receive streams, and it doesn’t recreate any of the subscriptions to and from that console. Without a saved Dante session, all of that work is gone.
That’s where having the Dante session saved along with the console file becomes pretty valuable. I can load my file onto the replacement console, restore the Dante configuration that went with it, and get the system back to where it was before the failure.
Dante networks have gotten considerably bigger over the years. Most of the corporate shows I do these days will have at least 12 channels of Shure Axient Digital, three Rios, and my redundant FOH playback and VST rig as part of the normal system. One Rio3224 is in audio backstage, another Rio3224 is in video, and a Rio1608 is at the stage. From there we may add Dante bridges to broadcast trucks or house systems, additional broadcast and monitor consoles, multitrack video playback rigs and other show-specific devices. There’s already a lot going on in Dante Controller before we’ve gotten into anything unusual.
Having those known quantities already built is a huge time saver. I shouldn’t be rebuilding and relabeling the familiar part of the network while I’m also trying to integrate everything that’s unique to that particular show.
Before I even get into labeling individual transmit and receive streams, I want the device names themselves to make sense. I don’t have much use for the random factory suffix that comes on a device. If an AD4Q shows up as Y00A-Shure-AD4Q-f80dasx, I’ll rename it something useful like Y00A-Shure-AD4Q-RF01-04. The next receiver becomes RF05-08, and so on.
The same thing applies everywhere else on the network. If there are multiple consoles, I want to know which one is FOH, which one is Broadcast and which one is Monitors just by looking at the device name. If there’s a RedNet 64 feeding the broadcast truck, I’ll append -Truck to the name. Rios get named for their location or function. I shouldn’t have to remember what a serial-number-like suffix means to know the role of a device.
Dante Controller is there to help keep the network organized, not overwhelm you. As these networks get larger, good device naming becomes even more important. When I open Controller, I want the purpose and location of each device to be obvious.
The same goes for the streams themselves. If I’m using a console with 144 Dante transmit channels, I want all 144 labeled according to my console template, whether I’m actually using every one of those channels on today’s show or not. If I open Dante Controller and see Tx 37, that doesn’t tell me much. Now I have to go back to the console, look at the Dante output patch, figure out what’s feeding 37, and then come back to Controller.
I’d much rather immediately know what everything is. RF channels should say RF. Record feeds should say record. Mix buses, matrices, PA feeds, broadcast feeds and anything else I’m putting onto the network should all have names that mean something.
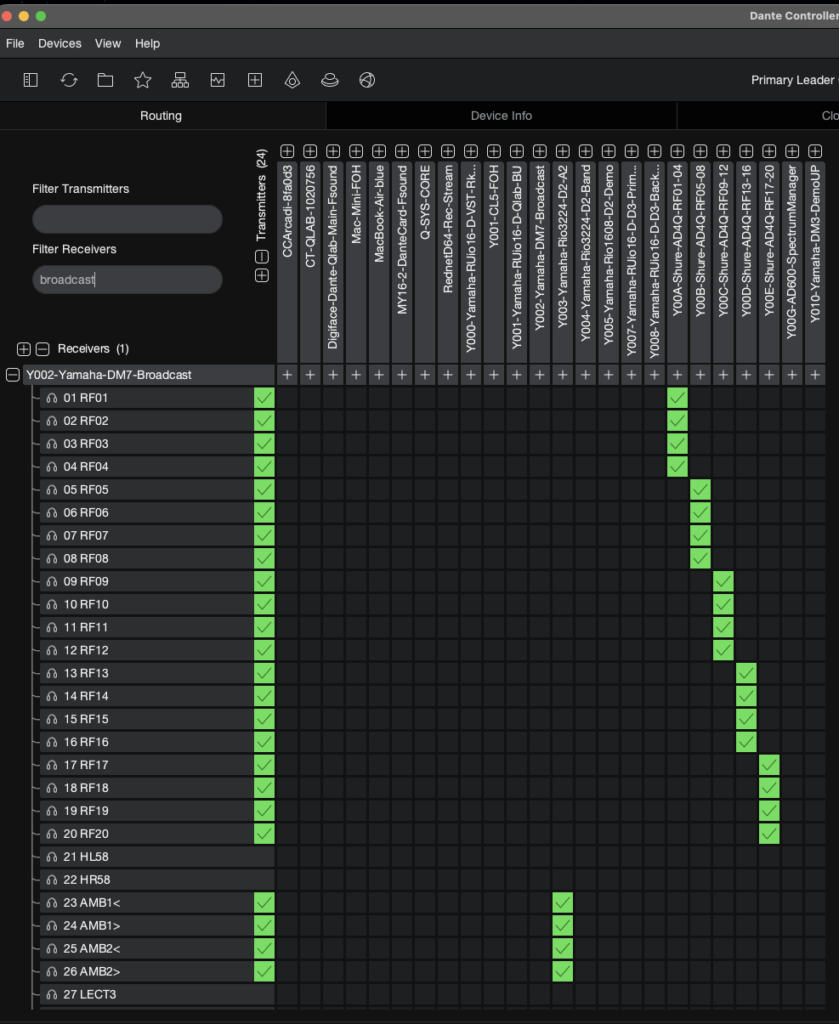
On my console template, the receive channels are labeled for their actual function. RF channels, playback, VST returns and other sources are identifiable directly in Controller.
I take the same approach on the transmit side, but I also like to keep the Dante channel number at the beginning of the stream name. For example, I have 52 BSM. I could simply call that stream BSM, but 52 BSM tells me what the stream is and exactly where it lives in the Dante output patch. When I’m bouncing between the console and Dante Controller, I don’t have to look up which Dante output BSM is assigned to.
I’m also a firm believer in keeping the console’s Dante transmit streams in their native one-to-one assignments, even when some of those buses will probably never leave the desk. If a bus exists in the console template, I still give its corresponding Dante transmit stream a name and leave it where it naturally falls in the numbering.
The biggest reason is that I don’t want an unlabeled Dante transmit stream to look like it’s available when it already corresponds to a bus in my console template. 02 HS Rec, for example, might normally stay internal to the console. But then the producer decides they want the headset mics recorded separately from playback, and now I need to send that bus to channel 3 of Record Deck 1. Because the stream is already labeled and sitting in its native position, I don’t have to go back into the console and figure out where that bus lives. I just make the subscription in Dante Controller and I’m done.
If I eventually run out of Dante transmit streams and need to repurpose one of those normally unused assignments, I can always relabel one and change the patch at that point. Until then, I’d rather keep every stream accounted for.
For the examples in this article, I’m using a Yamaha DM7 because that’s what this particular template was built around. The same basic idea applies to whatever Dante-enabled console you’re working on.
A good example on the DM7 is Stereo A. Natively, Stereo A corresponds to Dante transmit streams 59 and 60. Even if Stereo A is one of the first things I actually need to send somewhere on a particular show, I’m not going to move it up to Dante Tx 1 and 2 just because those streams happen to be available. I leave it at 59 and 60. The buses ahead of it keep their native positions whether I’m using their Dante outputs or not.
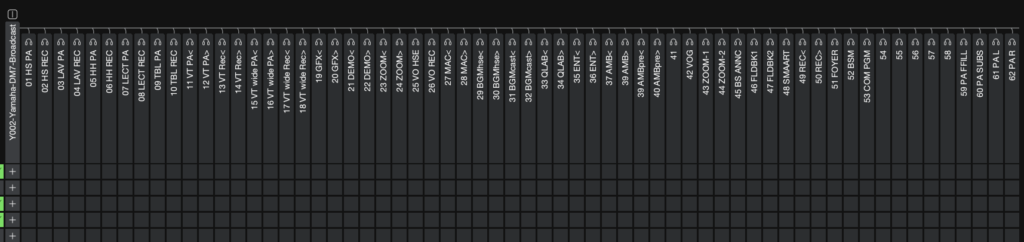
It also makes subscriptions easier to look at. There’s a big difference between making a subscription from one anonymous channel number to another and looking at two names that actually tell you what you’re connecting. It’s easier to spot a bad patch, and if somebody else has to get into your Dante network, they’re not reverse engineering the whole thing before they can make a change.
Saving the Work You’ve Already Done
Once I’ve built a known-good Dante configuration, I don’t really look at the next show as rebuilding that network anymore. I’m deploying something I’ve already built, then making whatever changes that particular show requires. If everything is named properly, the subscriptions are right and I’ve gone through rehearsal without problems, that’s a configuration worth keeping.
Another option is to build the configuration ahead of time using Audinate’s Dante Preset Creator. This is particularly useful if you already work from standardized console templates.
Building a Dante Preset Before the Gear Arrives
Dante Preset Creator lets you create an .xml Dante session preset without having the physical devices connected to your computer. You can define the devices you expect to have, configure them, label the transmit and receive channels and build the subscriptions ahead of time.
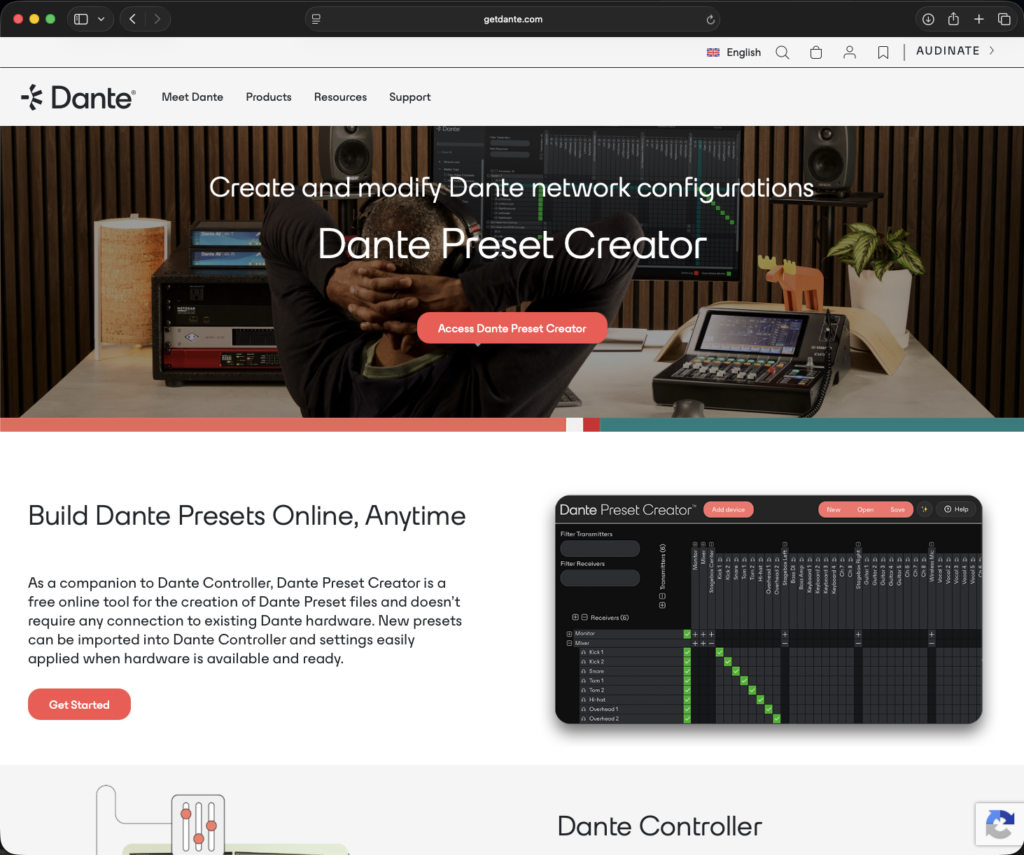
From the Preset Creator home page, create a new preset. I give mine a name that makes sense for the system or console template I’m building around. The goal is for this to be something I’ll recognize later, not another mystery file sitting in a folder six months from now.
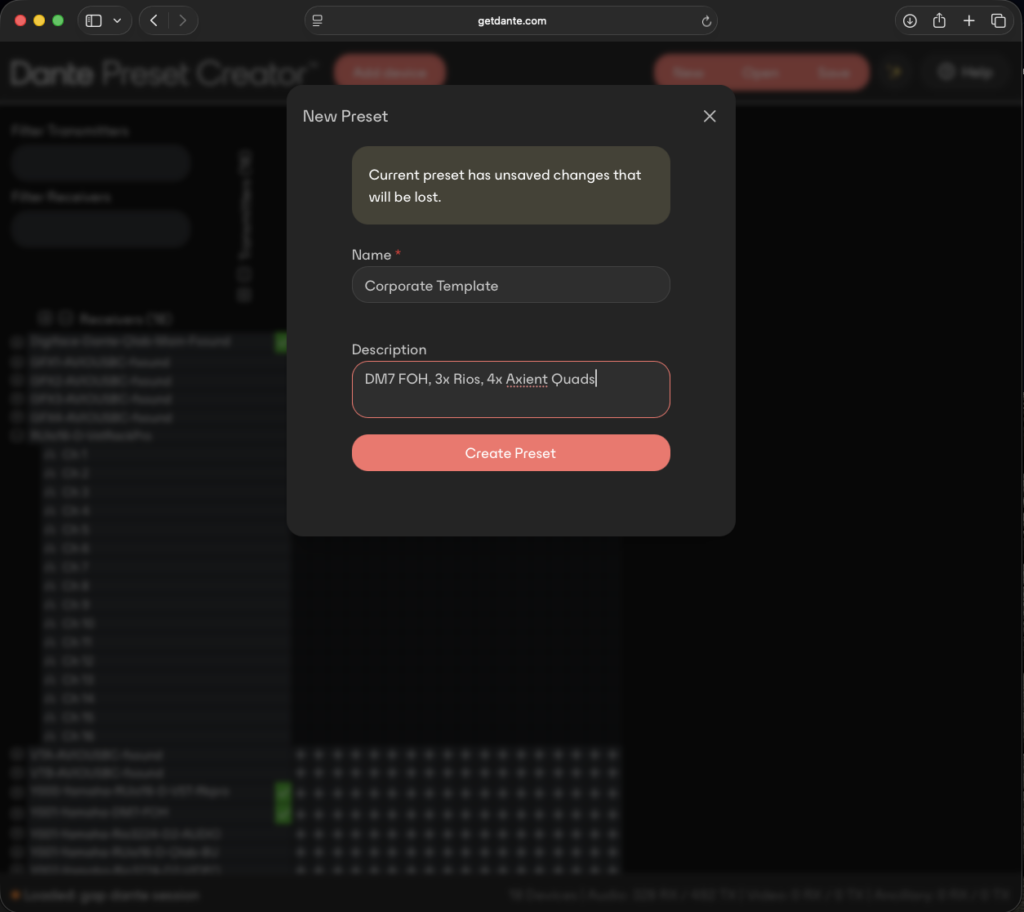
Once the preset is created, you’re initially looking at an empty routing matrix. From there you start adding the devices you expect to see on the real network.

For this example, I started with the DM7. Preset Creator lets me create a device, give it the device name I want to use, and specify the number of transmit and receive channels it will have.
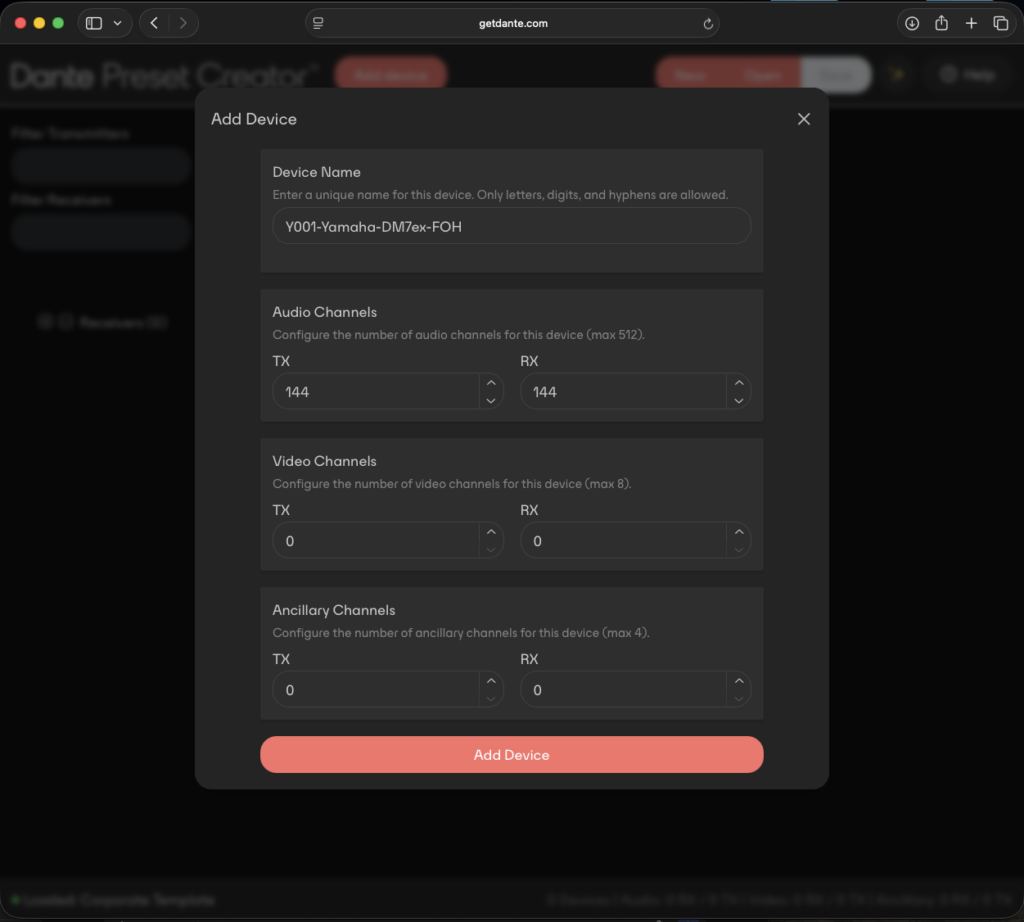
One thing to pay attention to here is the number of transmit and receive channels you create. They need to line up with the capabilities of the physical device you’re eventually going to push this configuration to. If they don’t, Controller may not let you apply that saved role to the device.
I learned this the first time I built a Shure Axient Digital quad receiver in Preset Creator. I created the four transmit channels I needed, but forgot about the single Rx Listen channel. When I got to show site, I couldn’t push the saved configuration to the actual AD4Q because the channel counts didn’t match. Once I went back and accounted for it, I was able to get the configuration to apply.
It’s worth checking what the actual hardware exposes to Dante before you spend a lot of time building out a device.
From the Device Config page I can also establish things such as sample rate and latency. I generally want those settings to match the standards I’m already using in my console template and the rest of the system.

The part I spend some time on is the channel labeling. This is where I’m essentially building the Dante side of my console template. On the transmit side I can go through and enter the names I want associated with each Dante output, and the receive side gets the same treatment.
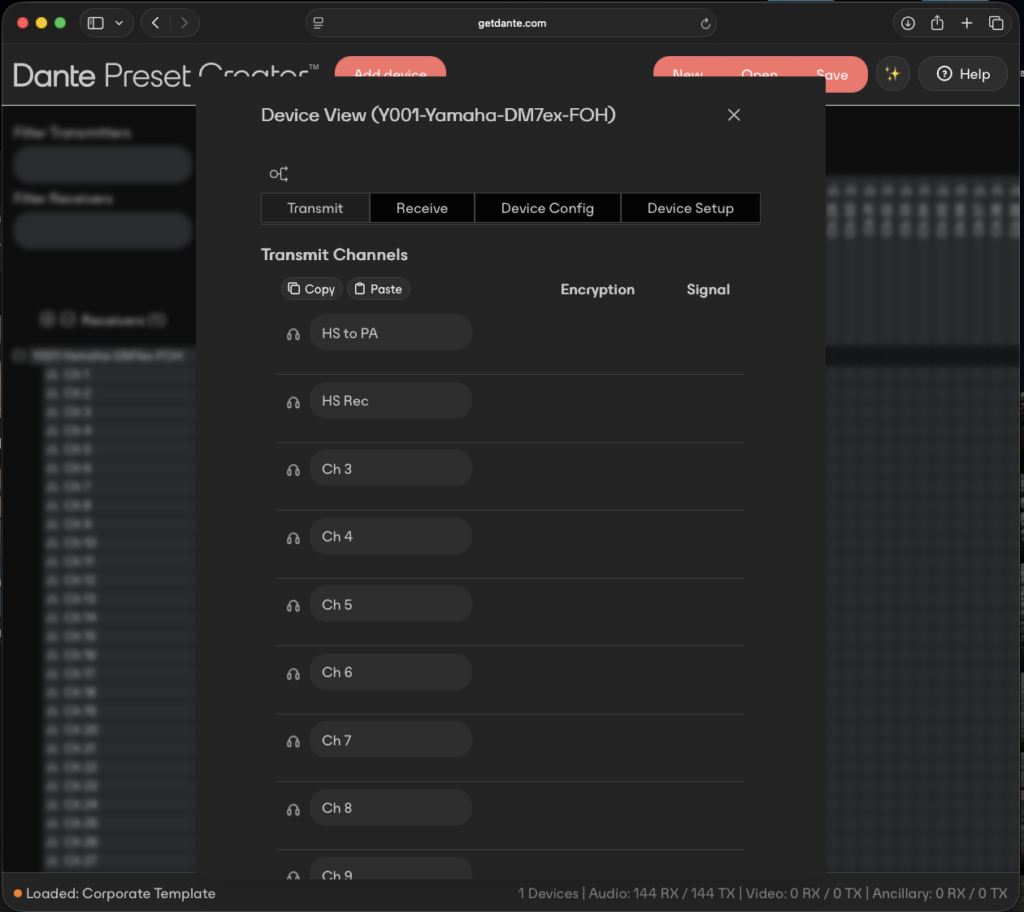
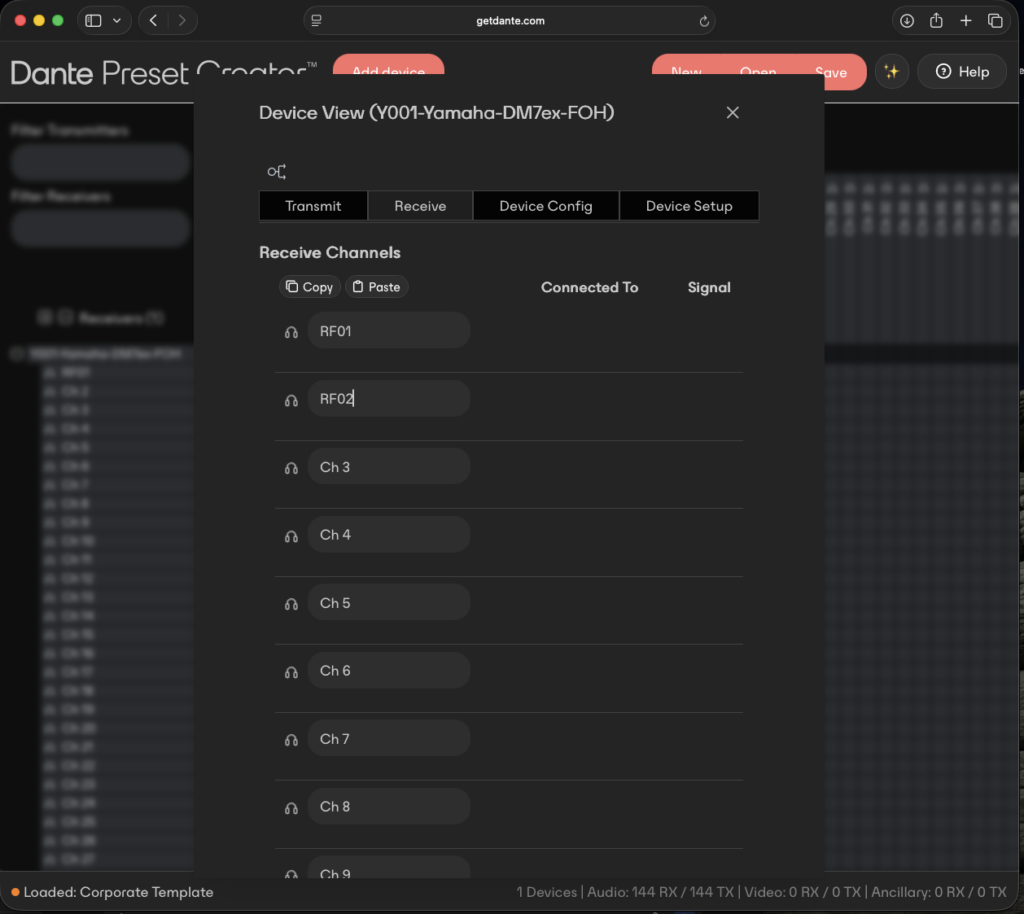
This can take some time the first time you build it, particularly on something like a DM7 with 144 channels in each direction. But I’d rather do that work once, when I’m not under any pressure, than repeatedly at show site.
After that, I continue adding the other devices that normally make up the system. In my case that might include Rio stage racks, RUio16-Ds, RME Digiface Dante interfaces, Shure wireless and whatever else is part of that particular package.
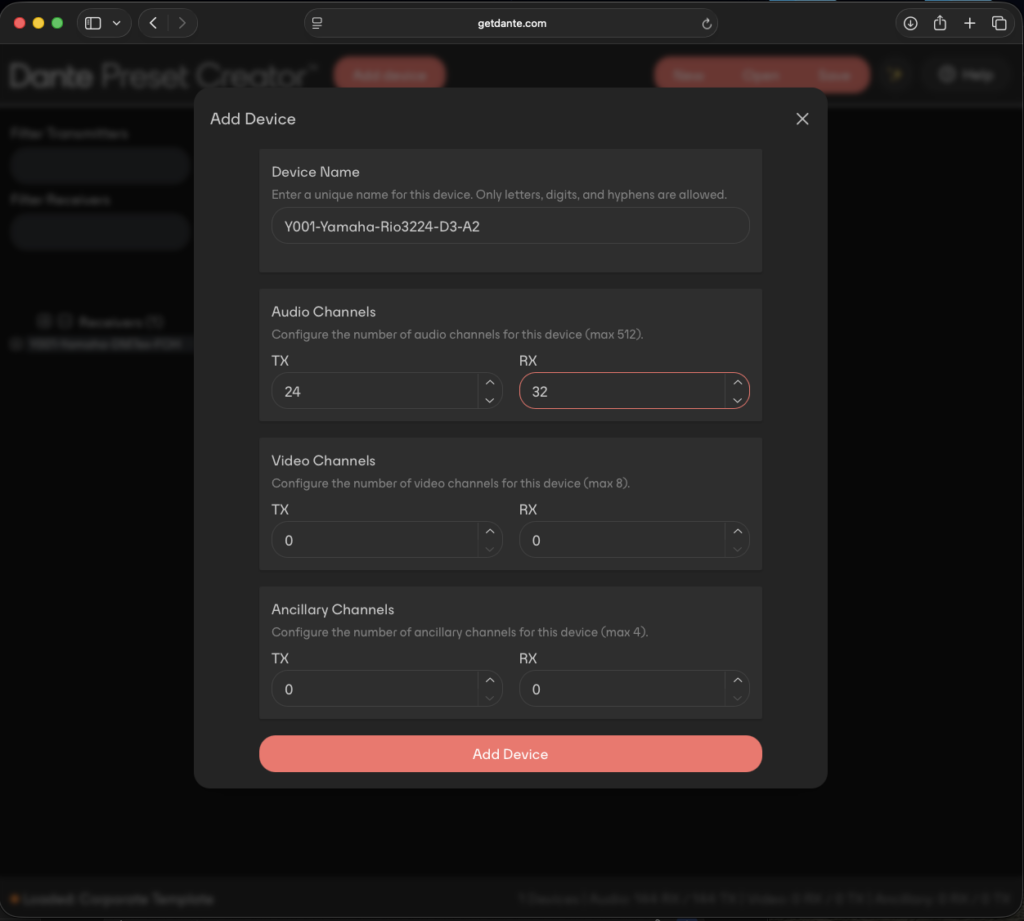
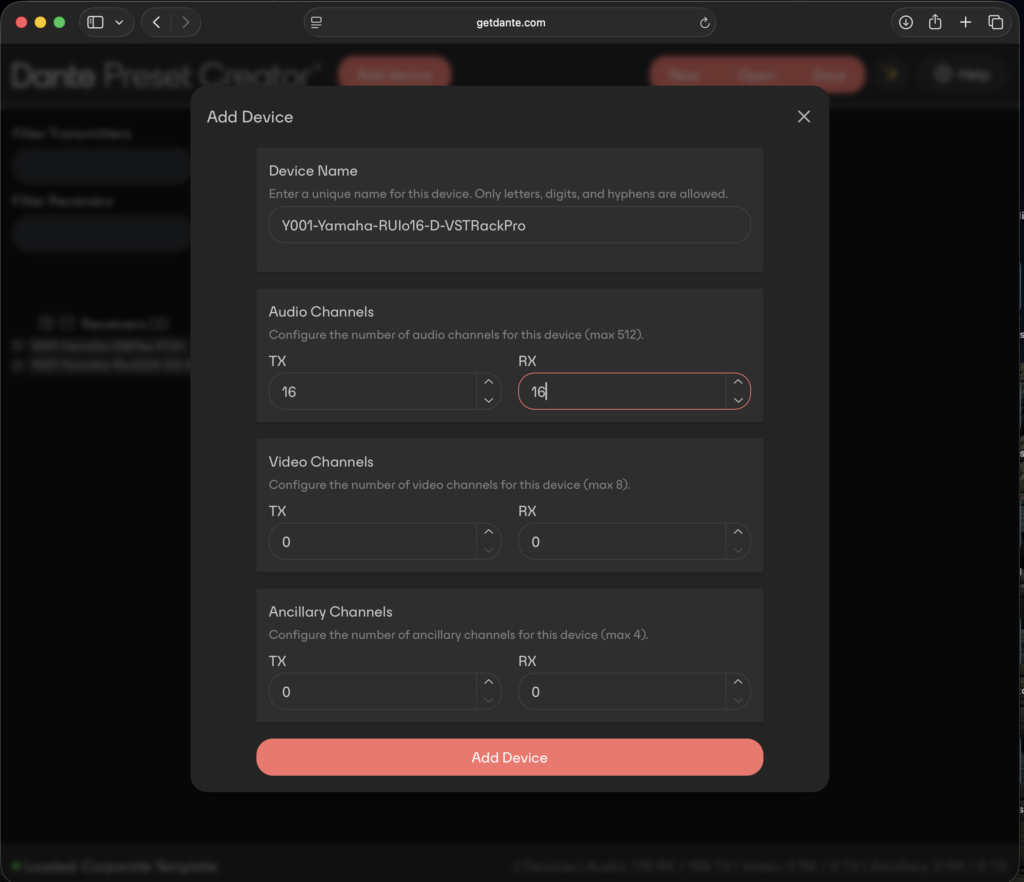
Once the devices and labels are in place, I can start making subscriptions right inside Preset Creator, essentially doing the same patching work I would normally do in Controller.
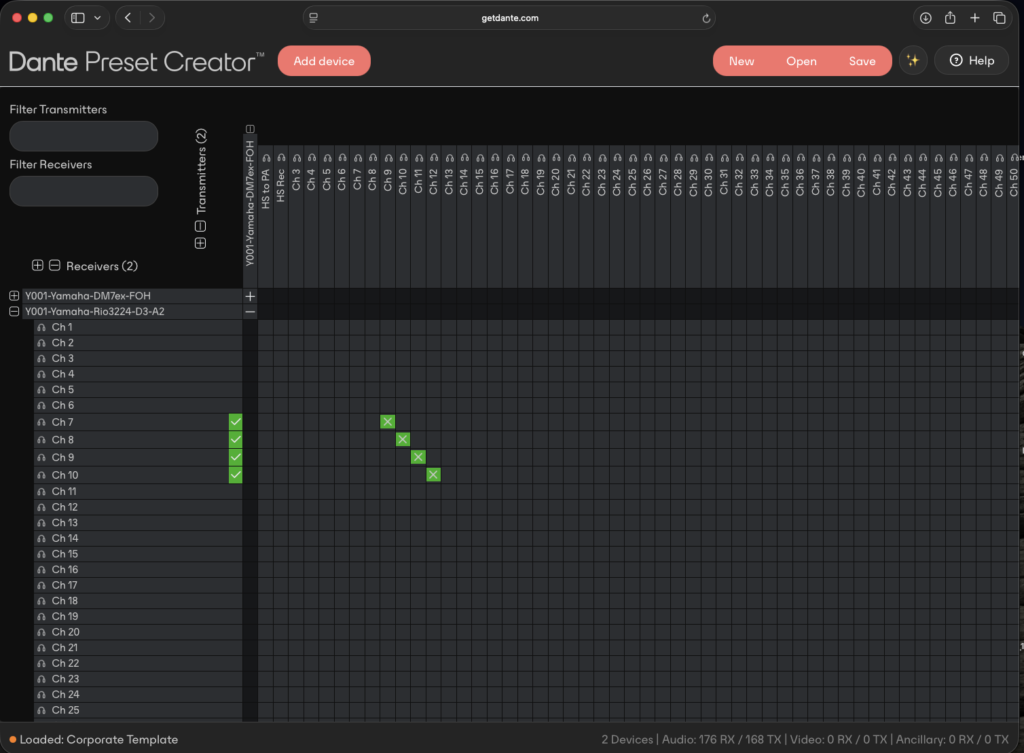
At that point the preset starts looking a lot more like an actual show network.
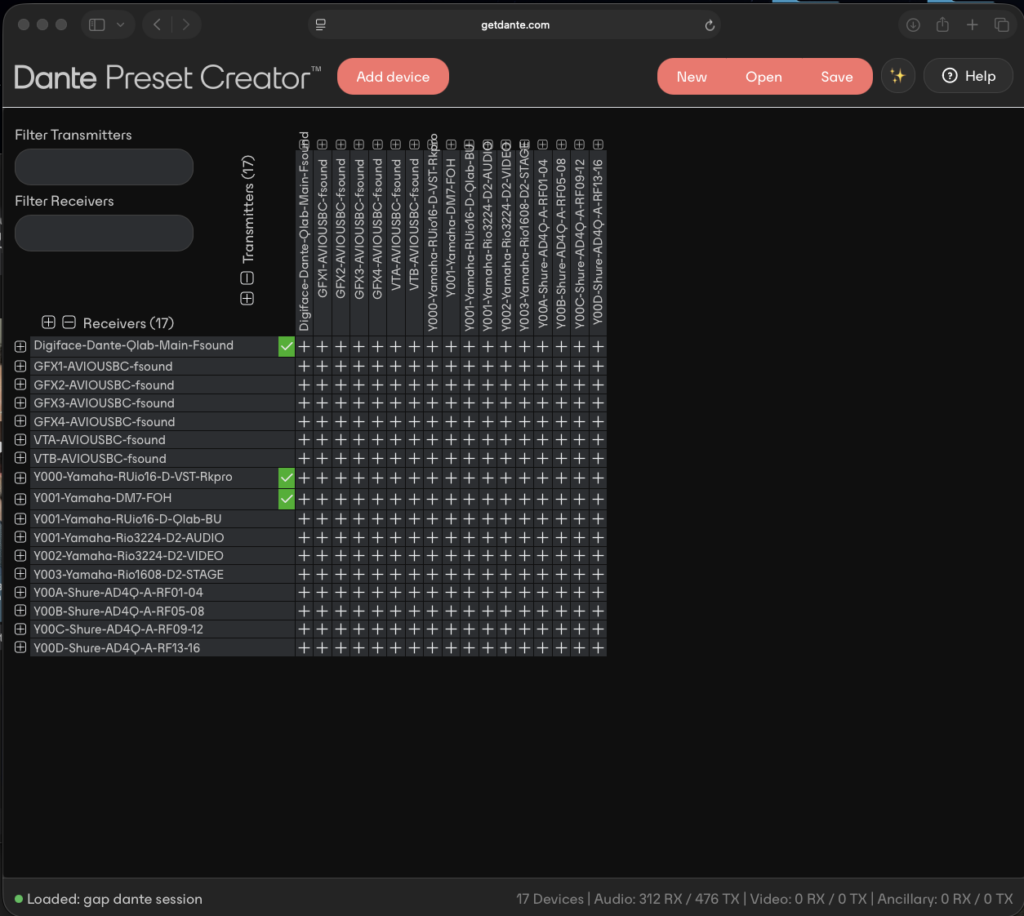
The configuration shown here has 17 devices in it, including multiple Rios, RUio16-Ds, Shure AD4Qs, Dante interfaces and the console. More importantly, I don’t have to start with a blank preset every time. I can open a Dante preset I’ve previously saved from an actual show and continue working from there.
This is especially useful when the next show has equipment that wasn’t part of the previous system. I can start with a known-good configuration containing the devices I’ve already built and labeled, then use Preset Creator to add whatever is new. I can name the transmit and receive streams, work out the subscriptions and integrate those devices with the rest of the system before I get to show site.
To me, that’s where Preset Creator really shines. I’m not choosing between building a network offline or saving a working network from show site. I can use both workflows together. A configuration I’ve already used successfully becomes the foundation for the next show, and Preset Creator lets me modify and expand it ahead of time.
Taking the Preset to Show Site
Whether I created the preset offline, modified an older configuration in Creator, or saved it directly from a previous show, the next step is the same. I connect the new system, let Dante Controller discover the physical devices, then load the saved preset.
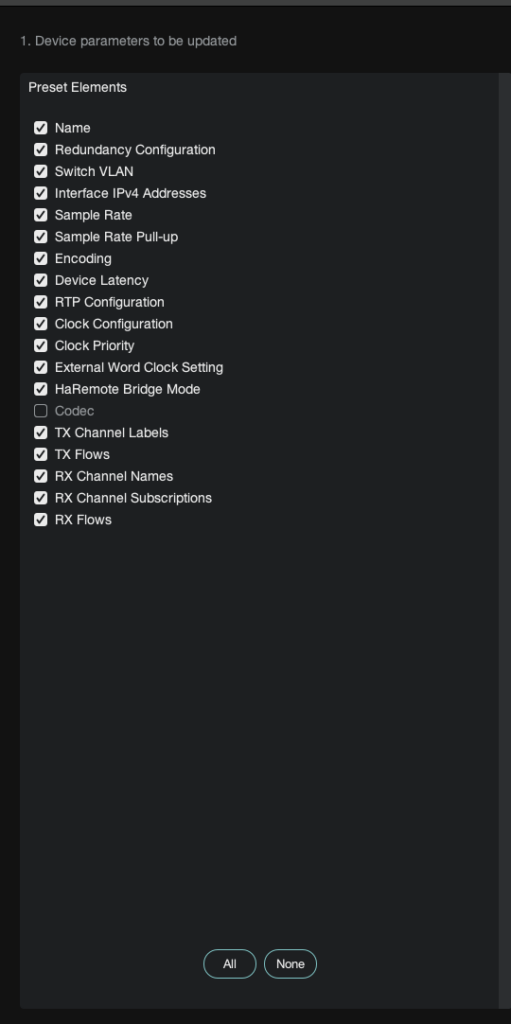
This screen is worth spending some time on because I don’t necessarily want to push every saved parameter to every device. Some are central to what I’m trying to accomplish, while others are much more device-specific.
Rather than go through every option here in the middle of the article, I’ve broken them out into a quick reference below.
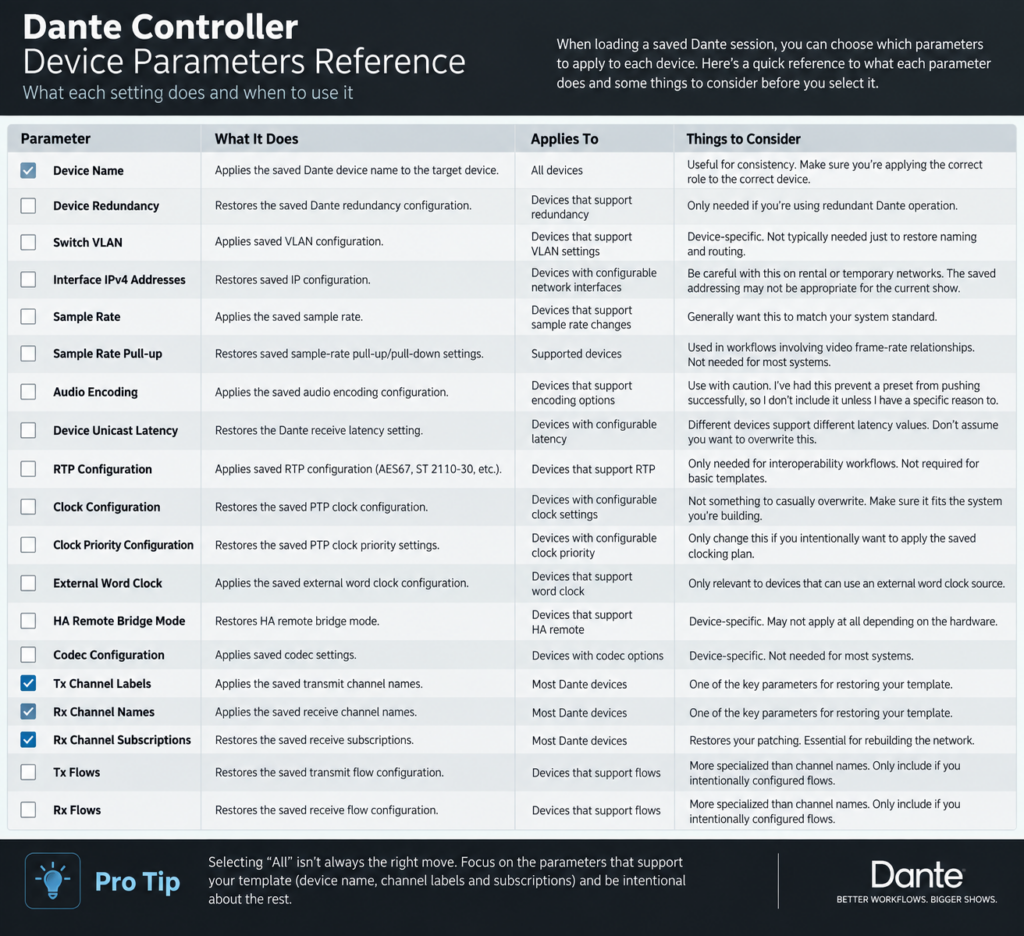
Quick reference to the Device Parameters available when loading a saved Dante session, including what each parameter does and a few things to consider before applying it.
For this workflow, Device Name, Tx Channel Labels, Rx Channel Names and Rx Channel Subscriptions are the parameters I’m usually most interested in. Those are the pieces that get the naming and patching I’ve already built back onto the new hardware.
I’m much more selective with some of the other parameters. Audio Encoding is one I’ve personally learned to be careful with. I’ve had Encoding selected prevent a preset from pushing successfully to a device, so I don’t include it unless I actually have a reason to.
The bigger point is that selecting All isn’t necessarily your friend here. I want to push the information I intentionally built into my template, not blindly overwrite every configurable parameter on a piece of rental gear because it happened to be stored in the preset.
Matching the Saved Devices to What’s Actually On Site
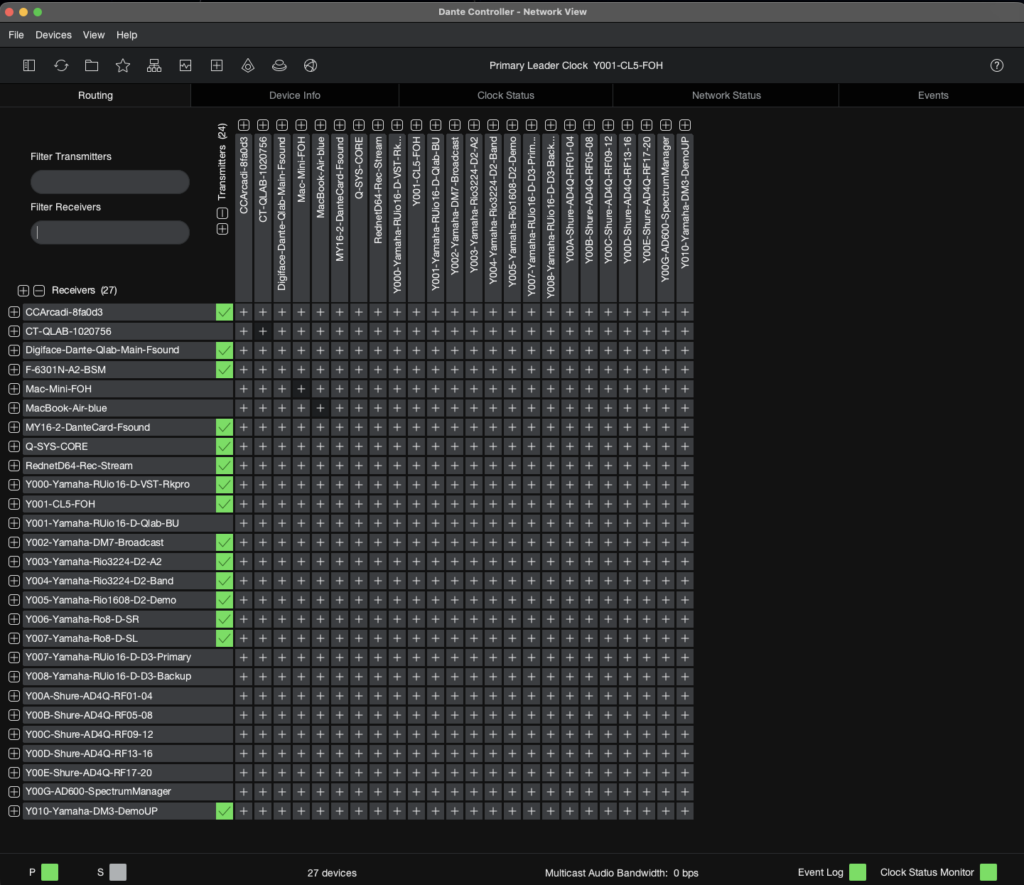
The next screen is where the saved devices in the preset get associated with the actual devices Controller sees on the new network.

The equipment on this show may not be the exact physical equipment used when I saved the original file. Devices get swapped and rental inventory changes. What matters is assigning the correct saved role to the correct physical device.
For example, a console that arrives on site might currently be named Y001-Yamaha-DM7-4kd73s, while my saved role is Y001-Yamaha-DM7-FOH. Once I’ve confirmed that it’s the console filling that role, I can map the saved role to it. If Device Name is selected when I apply the preset, the console takes on my Y001-Yamaha-DM7-FOH name along with whatever other selected parameters I’m applying.

You also don’t have to apply every device from the saved session. Maybe my saved configuration has 17 or 20 devices, but on this particular show I only want to restore the console and three Rios. I can map those four saved roles to the physical devices in front of me and leave everything else alone. That’s especially useful on a shared network where I may want my console and Rios to match my standard template while leaving wireless, broadcast or somebody else’s Dante devices untouched.
If you’re trying this for the first time and you’re a little nervous about what the preset is going to change, there’s no reason you have to start with the entire Dante network online. Connect your computer directly to the one device you’re trying to configure. You can load the preset into Dante Controller, map only that saved role to the device sitting in front of you and see exactly what changes without anything else on the network being involved. Once you’re comfortable with the process, put the device back on the network and work your way up from there.
You’ll also notice in my screenshot that Controller is flagging a couple of devices in red. This goes back to building the saved devices correctly. If the capabilities of the saved role don’t line up with the target hardware, Controller is going to tell you there’s a problem.
That’s exactly what happened with the AD4Q example earlier. The preset I built didn’t account for the receiver’s Dante Listen channel, so the saved role didn’t match the capabilities of the actual device. Those warnings are useful. The preset saves me from repetitive work, but it doesn’t eliminate the need to understand what I’m pushing and where I’m pushing it.
Once I’m satisfied that the roles are mapped correctly and I’ve selected the parameters I want to restore, I can apply the preset. I still go through the network afterward and verify it. I want to see the correct device names, make sure the subscriptions resolved, check clocking and make sure Controller isn’t showing me any errors.
Loading a preset doesn’t replace knowing Dante or understanding the system you’ve built. It just means I’m spending my time verifying the network and dealing with the things that are actually different on this show instead of rebuilding everything that’s the same.
Making Dante Part of the Show File
If I have a console template that I regularly use, I want a Dante configuration that goes with it. When I make meaningful changes to that network on a show, I save them. That configuration becomes part of the show file, not something I leave behind when I close Dante Controller.
The amount of Dante-enabled gear we’re using isn’t getting smaller. Taking the time to name the devices and channels, keep the Dante configuration consistent with the console template and save known-good presets makes a large network much easier to manage.
When I get to the next show, I want to spend my time dealing with what’s different about that show, not recreating work I’ve already done.
About the Author
Brian Frost is a freelance corporate audio engineer with over two decades in live event production. He specializes in large-scale corporate and hybrid events where routing architecture matters as much as sound quality. Known for designing flexible systems that scale with modern show demands, Brian works nationally and is based in Utah.
Learn more at fsound.net